Setup Instructions
Here are the full setup instructions for the CANTSTANDYA microphone mount
Setup Instructions
To download the setup instructions pdf file CLICK HERE
Cantstandya Microphone Mount For A Speaker Cabinet

Brief Summary
The first thing to note is that the Cantstandya mount is attached by utilising the gap between two opposing surfaces to form a wedge and secure a mount. This method sets it apart from any competitors that rely on a standard cabinet lip or box width to clamp on to. As we all know there are an innumerable array of speaker cabinets available and advantageously the Cantstandya isn’t limited to the lip size or speaker cabinet dimensions to achieve a secure mount.
The adjustable foot is lined with a layer of neoprene that has a robust sharkskin finish. It is important to note the purpose of the neoprene is to add griping properties and to absorb unwanted sonic rumble in the form of audio frequencies traveling from the stage or loudspeaker then on to be picked up by the microphone.
Method Of Attachment
First, let me explain to you the two standard methods used to attach the mount to a standard speaker box.
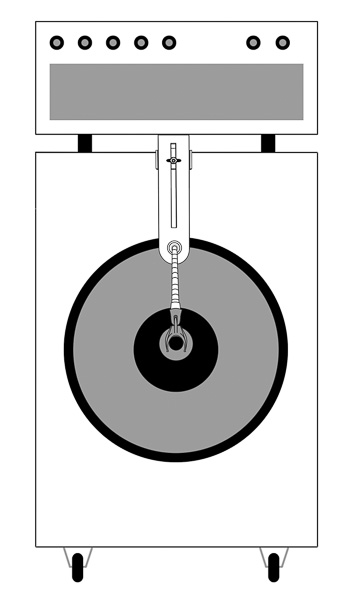
a) Holding the positioning arm perpendicular to the loudspeaker, slide the base of the body and retracted adjustable foot under the bottom lip of the cabinet. Loosen the fastener and adjust the foot upwards along the channel slot to meet the bottom surface of the cabinet. Once you’ve bridged the gap, tighten the fastener and secure the adjustable foot. Position the microphone to the desired distance from the loudspeaker.


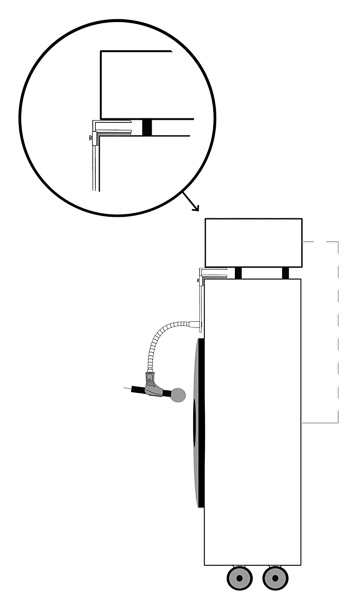
b) A second mounting point can be achieved utilising the gap between the cabinet and amplifier head. Rotate the mount 180 degrees and slide the base of the body and the retracted adjustable foot between the amplifier’s bottom surface and the cabinet’s top surface. Loosen the fastener and adjust the foot downwards to bridge the gap. Tighten the fastener and position the microphone to ‘the desired distance to the loudspeaker.


Now you may think well that’s all well and good, but what about combo amplifiers where the amplifier is inbuilt into the cabinet and there are no wheels or gap to utilise…. Well no drama! It’s even easier than the previous methods.

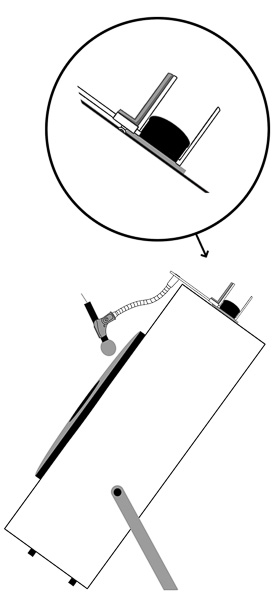
c) Holding the positioning arm perpendicular to the speaker, with your spare hand tilt the combo on its back edge. Slide the base and retracted adjustable foot under the front lip of the combo. Lower the combo onto the top of the adjustable foot and check a secure mount has been achieved. Position the microphone to the desired distance to the speaker.
All right then, what if a performer has chosen to tilt their combo amplifier? Stress not! As this isn’t an issue;

d) The adjustable foot and base can be used like a conventional clamp. By tilting and sliding the base of the body under the strap handle so the top of the base abuts the back of the handle strap. Slide the adjustable foot longitudinally along the channel slot until the bottom surface of the foot clamps around the front edge of handle strap. Tighten the fastener to secure the foot in place and adjust the microphone to the desired distance of the loudspeaker.
Advantages
So know you’ve seen the versatility of the Cantstandya microphone mount, I think it’s worth mentioning some of the great advantages a product like this has over the faithful mic stand.
- Firstly there isn’t much that can wear out mechanically speaking, unlike the adjustable arms or on legs on a typical tripod stand.
- Secondly a number of Cantstandya’s can easily be thrown in a backpack to avoid the disappointment of finding out all the stands are broken or missing on arriving to a venue for sound check.
- With the multitude of small stages around, the Cantstandya has the added advantage of taking up next to no valuable stage or floor real estate, unlike the clutter that multiple stands can cause.
- When stage space becomes a concerning factor, microphone stands can easily be knocked out of position; this is unlikely to happen with the Cantstandya’s mounts due to the fact they are attached to the performer’s cabinet or amplifier. A sweet bonus also is that performers have greater access to their amplifiers and loudspeakers due to not being shielded by an array of microphone stands.
- For festivals the Cantstandya is perfect as it can be attached backstage and wheeled out with the speaker cabinet for quick-change overs times between acts.
Ok so that about wraps it up. We hope you enjoy using the Cantstandya Mount for years to come.


